Up until this point I could never create pixel-perfect animations in Unity’s timeline. The standard animating workflow was:
- Placing a Transform at the starting point
- Hitting the record button
- Moving the Transform by a fraction to create the keyframe (since it is not automatically created)
- Moving the Transform back to the desired initial position
- Moving the cursor on the timeline to the end frame
- Moving the Transform to the final position
This process will interpolate the position in each frame between the start and end points to create the animation. The difficult part is that you have to either edit the position by dragging the Transform or selecting the Transform and then editing the position values. But in order to do that, you need to deselect the timeline.
So the process is very cumbersome. It was serviceable for a while, but eventually my animations became too complex that I needed to develop my own solution. I found a good tutorial on creating custom assets that adds subtitles to the Timeline as editable tracks.
Creating custom Playable assets
Using that video as a guide, I created a custom Timeline track that lets you set the position on the track itself - no longer do I need to switch away from the Timeline window to change the position. This required the following classes:
Playable- extendsPlayableAsset, IPropertyPreviewand defines the editable fields on the track, such as X and YMixerBehaviour- extendsPlayableBehaviourand defines what happens in a frame. In my case, this interpolated the position between the start and end positionsTrack- extendsTrackAssetand creates and configures the Playable assets and blends them together if there is more than one
The important part is in the MixerBehaviour where you need to override ProcessFrame.
public override void ProcessFrame(Playable playable, FrameData info, object playerData)
{
    Transform t = playerData as Transform;
    if (_animator == null)
    {
        _animator = t.GetComponent<Animator>();
    }

    if (_trackSettings == null)
    {
        _trackSettings = GetTrackSettings(playable);
    }

    // Determines if there are currently any active input playables in this frame
    bool hadActiveInputPlayable = false;

    // Find which playable inputs are being currently played by looking for those with inputWeight > 0
    int inputCount = playable.GetInputCount();
    for (int i = 0; i < inputCount; i++)
    {
        var inputWeight = playable.GetInputWeight(i);
        if (inputWeight > 0)
        {
            hadActiveInputPlayable = true;

            // Get the input and behavior
            ScriptPlayable<ChangeTransformPositionBehaviour> inputPlayable =
                (ScriptPlayable<ChangeTransformPositionBehaviour>)playable.GetInput(i);
            ChangeTransformPositionBehaviour input = inputPlayable.GetBehaviour();

            // Determine where the transform will start from
            // If we are on the first clip, we may be starting at the Transform's current position (before the Timeline started)
            var startPosition = i == 0 && _trackSettings.RelativeToCurrentPosition
                ? input.initialTrackPosition
                : input.startPosition;

            // Determine how much the Transform has moved along the movement vector (end - start) based on the input/clip's current time
            var movementVector = (input.endPosition - startPosition) *
                                 (float)(inputPlayable.GetTime() / inputPlayable.GetDuration());
            var movementDirection = movementVector.normalized;

            // Update the Transform's position and Animator
            t.SetPosition(input.isLocalPosition, startPosition + movementVector);
            if (_animator != null)
            {
                _animator.SetFloat(_trackSettings.AnimatorParameterNameSpeed, 1);
                _animator.SetFloat(_trackSettings.AnimatorParameterNameHorizontal, movementDirection.x);
                _animator.SetFloat(_trackSettings.AnimatorParameterNameVertical, movementDirection.y);
            }
        }
    }
}
Interpolating position
In order to interpolate the position of the Transform for each frame, you take the distance between the two points and then use the time elapsed on the track to get the relative position at that frame.
// Determine how much the Transform has moved along the movement vector (end - start) based on the input/clip's current time
var movementVector = (input.endPosition - startPosition) *
                     (float)(inputPlayable.GetTime() / inputPlayable.GetDuration());
var movementDirection = movementVector.normalized;
Updating the Animator
If you need to animate, you can set any Animator parameters based on the movementVector from the previous step.
if (_animator != null)
{
    _animator.SetFloat(_trackSettings.AnimatorParameterNameSpeed, 1);
    _animator.SetFloat(_trackSettings.AnimatorParameterNameHorizontal, movementDirection.x);
    _animator.SetFloat(_trackSettings.AnimatorParameterNameVertical, movementDirection.y);
}
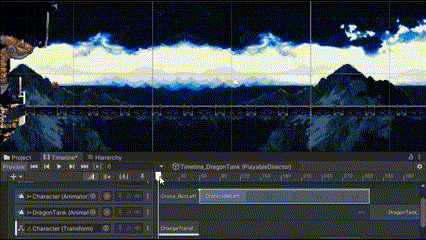
Build Timelines without leaving the window
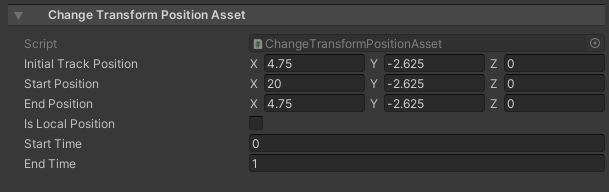
All animation of Transforms in the Timeline can now be done exclusively in the window itself. When you create the track asset, you are presented with the Start Position and End Position fields. Initial Track Position is an optional additional field I found useful that will hold the Transform’s initial position if we want to animate it’s position dynamically. Eg, the Transform could start at (0, 0), or (1, 0), or (0, 1), depending on where the player left the character in the game.
It’s also very easy to preview what the end result will look like. Scrubbing the Timeline track will correctly interpolate the position without having to start the game. As you can see below in this example, the Transforms move based on the cursor’s position on the track.